 Save
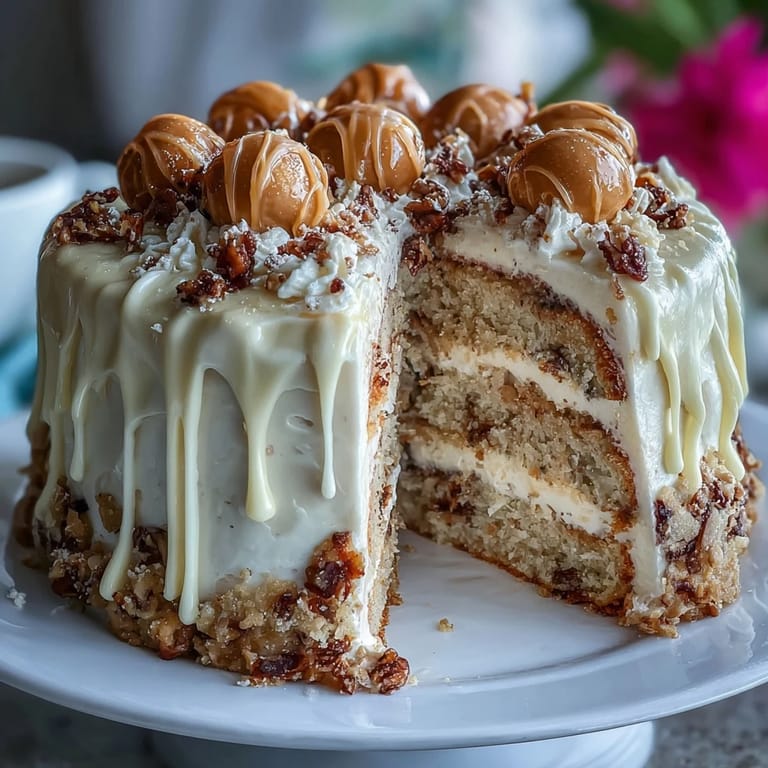
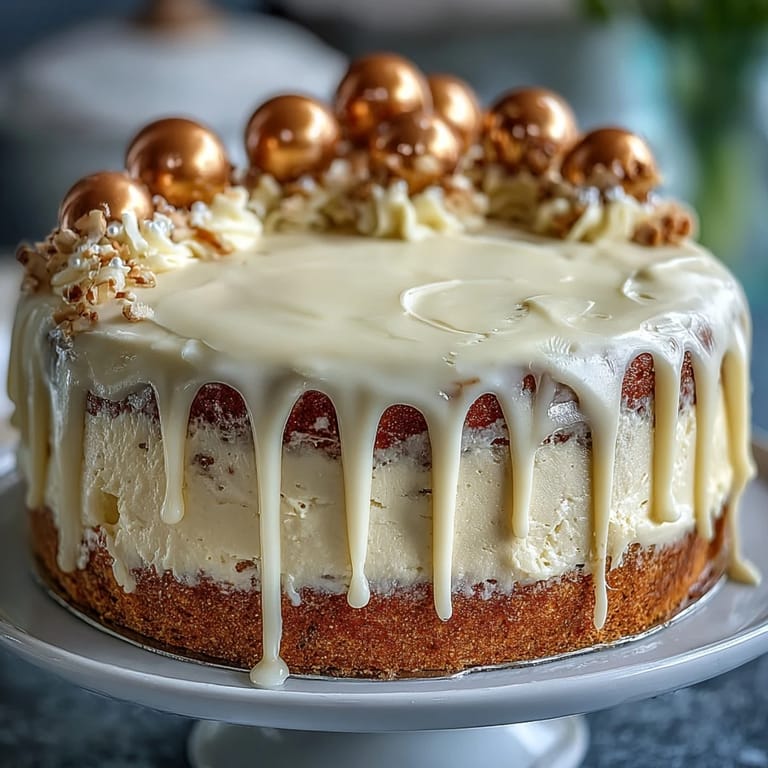
Save My cousin texted me a photo of her graduation cap mid-throw, and I knew exactly what I needed to make. There's something about white chocolate that feels celebratory without trying too hard—it catches the light, it's elegant, and honestly, it's forgiving enough that even when I've had kitchen disasters, this cake somehow pulls through. I developed this recipe after watching her face light up when she saw the gold balloons cascading down the tiers, and I've made it three times since for different milestones. The vanilla sponge is tender enough to slice with a fork, the buttercream tastes like clouds, and that white chocolate drip? It's pure joy.
I'll never forget frosting this cake at 11 PM the night before my friend's graduation party, piping that first drip and watching it cascade exactly the way I'd hoped. My partner walked in halfway through, tasted a crumb of buttercream from the bowl, and said, "This is the cake that gets you invited to every party," which made me laugh and then panic about whether I'd made enough. By the time those gold pearls went on top, the whole kitchen smelled like celebration, and even though I was exhausted, I couldn't stop smiling at what we'd created together.
Ingredients
- All-purpose flour (2 ½ cups): The foundation of your sponge—measure by weight if you can, as it makes the cake remarkably consistent.
- Baking powder (2 ½ tsp): Don't skip checking the expiration date; stale baking powder is why cakes sometimes sink in the middle.
- Unsalted butter (1 cup plus 1 cup): Use room temperature for both the sponge and buttercream, or your mixing times will stretch and your texture will suffer.
- Granulated sugar (2 cups): This creams with butter to trap air, which makes the cake rise and stay tender.
- Large eggs (4): Room temperature eggs emulsify better and create a finer crumb structure than cold ones.
- Pure vanilla extract (1 tbsp plus 1 tsp): The real stuff makes a noticeable difference; imitation extract tastes flat by comparison.
- Whole milk (1 cup): Alternate with flour so the batter stays balanced and doesn't deflate.
- Powdered sugar (4 cups): Sift it before measuring to avoid lumps that would grit between your teeth.
- White chocolate (6 oz melted plus 6 oz chopped): Chop it finely so it melts evenly and incorporate it only after cooling slightly, or the buttercream will seize.
- Heavy cream (2–3 tbsp plus ¼ cup): This tempering ingredient transforms both the buttercream and the drip, so don't eyeball it.
- Edible gold spray or luster powder: A tiny investment that elevates the whole presentation from homemade to showstopping.
- White chocolate crispy pearls or malt balls: These become your balloons—find them in baking sections or online, and they're worth every penny.
Tired of Takeout? 🥡
Get 10 meals you can make faster than delivery arrives. Seriously.
One email. No spam. Unsubscribe anytime.
Instructions
- Set the stage:
- Preheat your oven to 350°F and grease three 8-inch round pans with butter, then line the bottoms with parchment paper cut to fit. This prevents sticking and makes turning out the layers almost effortless.
- Dry ingredients together:
- Whisk flour, baking powder, and salt in a medium bowl until there are no lumps. This distributes the leavening evenly so your cake rises level.
- Cream the butter and sugar:
- Beat room temperature butter with sugar for about 3 minutes until it's pale, fluffy, and noticeably lighter in color. This incorporates air, which is the secret to a tender crumb.
- Incorporate the eggs:
- Add eggs one at a time, waiting for each to fully blend before adding the next, then mix in vanilla. Rushing this step creates an uneven batter and denser cake.
- Alternate wet and dry:
- On low speed, add a third of the flour mixture, then half the milk, then another third of flour, then the rest of milk, then the final flour. Begin and end with flour to avoid overmixing.
- Divide and bake:
- Distribute batter evenly among pans (use a kitchen scale if you want perfect layers), smooth the tops, and bake for 30–35 minutes until a toothpick comes out clean. The smell when they're done is worth the wait.
- Cool with patience:
- Let cakes rest in pans for 10 minutes so they firm up just enough to turn out, then cool completely on wire racks. Assembling while warm will cause the buttercream to slide right off.
- Make the buttercream:
- Beat butter until smooth, gradually add sifted powdered sugar, then fold in cooled white chocolate, vanilla, salt, and 2 tablespoons cream. If it's too thick, add more cream a teaspoon at a time until it's spreadable but holds peaks.
- Assemble the layers:
- Level the cake tops if they domed (a serrated knife works beautifully), place the first layer on your serving plate, spread with buttercream, and repeat with the other layers. Apply a thin crumb coat, chill for 30 minutes, then add your final thick coat and smooth everything until it's pristine.
- Create the white chocolate drip:
- Heat cream until steaming, pour it over finely chopped white chocolate, let it sit for 1 minute, then stir until silky. Cool to room temperature so it drips slowly rather than running off like water.
- Apply the dramatic drip:
- Using a spoon or squeeze bottle, let the ganache fall naturally over the top edge of the cake in messy, elegant cascades. Fill the top with extra ganache and smooth it level, accepting that imperfection is what makes it feel real.
- Make your gold balloons:
- Spray the crispy pearls lightly with edible gold spray (work outdoors or in a well-ventilated space), let them dry completely, then insert toothpicks or thin cake wires. Cluster them on top in a way that feels celebratory, not perfectly symmetrical.
- Final chill and serve:
- Refrigerate the finished cake until you're ready to serve, then bring it to room temperature for 30 minutes so the flavors wake up and the texture is at its best.
 Save
Save The moment that made me fall in love with this cake happened when my friend's grandmother tried a slice, closed her eyes, and said, "This tastes like happiness," which is exactly what a celebration cake should do. That one sentence made every moment of careful measuring and precise piping feel worth it.
Why White Chocolate Works for Celebrations
White chocolate has an elegance that milk chocolate can't quite touch—it's softer, almost delicate, and it catches light in a way that feels inherently festive. When you spread it thick and let it drip, it doesn't look homemade in a struggling-in-the-kitchen way; it looks intentional and thoughtful. I've learned that the best celebration cakes aren't the ones with the most layers or the wildest flavors; they're the ones where every component is executed well and the presentation feels like you put genuine thought into marking someone's big moment.
The Magic of the Drip
That white chocolate ganache waterfall is what transforms a pretty cake into a showstopper, and honestly, it's forgiving once you understand the physics. If your drip is too thick, it won't cascade; too thin, it'll run off like frosting soup. The sweet spot is room temperature ganache dropped from a spoon or squeeze bottle right at the edge, and gravity does most of the work. I've made this drip probably fifty times across different cakes, and the first time I stopped fighting to control it and just let it fall naturally, everything clicked.
Gold Balloons: The Tiny Touch That Changes Everything
Those gold-dusted pearls are the secret weapon that makes people gasp when they see the cake. They're not complicated to make, but they look like you hired a pastry chef, which is the entire point of a celebration cake. The spray needs to be light and quick; you're looking for a shimmer, not a drench. I learned this the hard way when I over-sprayed a batch and they looked more muddy than golden.
- Work in a well-ventilated space or outdoors when spraying, because edible gold spray settles on everything and smells stronger than you'd expect.
- Let the pearls dry on parchment paper for at least 15 minutes before handling, or the coating will transfer to your fingers.
- Insert the toothpicks or wires just before serving, because they can soften the frosting if they sit too long.
 Save
Save This cake has become my go-to for every milestone worth celebrating, and every time I make it, I feel like I'm giving people not just dessert but a memory. Serve it with sparkling wine, watch people's faces when they see those gold balloons, and enjoy knowing you created something that tastes as special as it looks.
Recipe FAQs
- → How do I create the white chocolate drip?
Heat heavy cream until just simmering, then pour over finely chopped white chocolate. Let sit for a minute before stirring until smooth. Cool before dripping over the cake edges.
- → What is the best way to achieve a moist vanilla sponge?
Alternate adding the flour mixture and milk to the creamed butter and sugar, starting and ending with flour. Mix until just combined to keep the sponge tender.
- → How are the gold balloon decorations made?
Spray white chocolate crispy pearls or malt balls with edible gold spray or roll them in gold-dusted luster powder. Once dry, attach to toothpicks or thin wires and arrange on top.
- → Can this cake be made ahead of time?
Yes, it can be refrigerated for up to 3 days. Bring to room temperature before serving for best texture and flavor.
- → What tools are needed for assembly?
Electric mixer, round cake pans, offset spatula, parchment paper, saucepan, squeeze bottle or spoon for the drip, and toothpicks or wires for decorations.